| A digital image is a rectangular grid of pixels, or "picture elements," illustrated by the image on the right, which consists of 52x35 pixels; 1820 total. It has been enlarged 5x (to 260x175 pixels) to make the pixels visible. Pixels appear as squares when enlarged in this way. Digital images exist as an array of bytes in a computer's RAM memory or as files in memory cards, hard drives, and CDs or DVDs. Several popular file formats are described below. |
Each pixel typically consists of 8 bits (1 byte) for a Black and White (B&W) image or 24 bits (3 bytes) for a color image-- one byte each for Red, Green, and Blue. 8 bits represents 28 = 256 tonal levels (0-255). 16-bit B&W and 48-bit color image formats are also available; each pixel represents 216 = 65,536 tonal levels. Editing images in 16/48-bits produces the highest quality results; you can save images in 8/24 bits after editing is complete. An image's resolution is the total number of pixels, e.g., 1600 x2000 = 3.2 Megapixels, which corresponds to 3.2 Megabytes inside your computer for 8-bit B&W images or 9.6 Megabytes for 24-bit (3 bytes/pixel) color images. There are several other definitions of "resolution." See the explanation below.
Digital images are obtained from digital cameras or by scanning film or prints. Scanners are specified by their dpi or ppi resolution-- dots (actually, pixels) per inch they can obtain from the source. Scanning the original source-- the negative or slide-- always produces better quality than scanning a print. Printers are specified by their dpi (dots per inch) "resolution," typically 720, 1440 or 2880 for Epson. This number is the stepper motor pitch, not the actual visual resolution. It typically requires several printer dots to represent one image pixel. You don't need to worry about the correspondence between image pixels and printer dots; this is handled by the image editor and printer driver software.
Image resolution and print size
 | Considerable confusion arises because image size is specified by the number of pixels, the "resolution" in dots or pixels per inch (dpi or ppi), and the physical size (width and height). But the only attribute that counts is the number of pixels. The image on the left was taken on the Canon EOS-10D, converted from RAW using the Canon File Viewer Utility (which I've since replaced with Capture One DSLR LE), adjusted for color (though far from finished), then resized to 260x175 pixels wide in my favorite image editor, Picture Window Pro. |
 .
. .
size = pixels/dpi (or pixels/ppi)It make no difference whether the image is 3437 dpi, 22.7x15.1 mm (the actual size of the EOS-10D digital sensor) or 17.07 dpi, 15x10 feet (a billboard); each of the 3072x2048 (6.3 million) pixels (6.3 megapixels) is exactly the same. I didn't change the Resolution (dpi setting) when I resized the image, hence the "size" of the new 200x133 pixel image size is tiny: 1.11x0.74 inches. This "size" is completely unrelated to the size you see on your monitor.
To add to the confusion, the word "Resolution" has several meanings. It can be the highest spatial frequency where a line pattern is visible: See the series on Image sharpness and MTF. It often refers to the total pixel count of an image, e.g., 3072x2048 pixels for the EOS-10D. I prefer either of these definitions to the dpi/ppi setting, which has nothing to do with the total detail present in an image, and which can be changed without changing a single pixel. But we're stuck with it in image editing programs.
You can easily change Resolution (dpi), hence Width and Height, without changing pixel count, i.e., you can rescale the image without resizing (i.e., resampling) it. In Picture Window Pro, open the Resize dialog box (above), click on the arrow to the right of the Preserve, then select File Size and Proportions. When you can change either Width, Height, or Resolution (dpi), the other two follow. In Photoshop, open the Image Size dialog box, shown below, and leave Resample Image unchecked. Check Resample Image if you want to change the pixel count-- to resize the image.
 | Picture Window Pro If you right-click on the image in Picture Window Pro, then click on Display info, the Window Info box appears. The properties of the resized 200x133 pixel image are shown on the left. The Size numbers are the same as the New column in Resize dialog box, above. But the File Size, 8,305 pixels, is much smaller than the 79,800 byte image size (200x133 pixels x 3 bytes/pixel). This is the result of JPEG compression. GIF and PNG files are also compressed, but TIFF files are not: Image and file sizes are the same. I usually sharpen an image (using the simple Sharpen transformation,with Amount around 70%) after resizing it down. |
In Picture Window Pro you select the print size when you print. The Width and Height attributes are ignored. This doesn't exactly hold for Photoshop.
Photoshop 6.0
Photoshop's default Print... command tries to print images at the specified Width and Height. When you try to print the original 17.07x11.38 inch image on letter-sized paper, an annoying message appears, "The image is larger than the paper's printable area; some clipping will occur." There are two solutions.
- You can rescale the image using the Image Size dialog box, according to the instructions above. You rarely need to resize it.
- Click on Print Options... instead of Print... in Photoshop 6 (Print with Preview... in Photoshop CS). The first time you open this box for an image, Scale is set to 100% and Scale to Fit Media is unchecked. If you check Scale to Fit Media, Scale is adjusted so the image fits the page. You may need to click Page Setup... to adjust borders and orientation (Portrait or Landscape). Or you can leave Scale to Fit Media unchecked and manually set Scale. A small page preview in the Print Options box helps with the setting, which will be remembered as long as the image remains open.
How many pixels to you need for a sharp print?
| | Perceived print quality* |
| | Outstanding. As sharp as most printers can print; about as sharp as the eye can see at normal viewing distances. |
| | Excellent. Close to 300 PPI for small prints, 8½x11 (or A4) and smaller. Outstanding quality in large prints, 11x17" (or A3) and larger, which tend to be viewed from greater distances. |
| | OK for large prints. Adequate, but not optimum, for small prints. |
| | Adequate, but not optimum, for large prints. Mediocre for small prints. |
*This table assumes that the image is sharp. A more accurate table, based the true image sharpness produced by the lens/camera combination, is presented in the introduction to Sharpness in Imatest.com.
300 pixels per inch (ppi) is about as sharp as the eye can see on an inkjet print; it can be very impressive in a print from a sharp image file. Remember, these numbers are actual pixels per inch on the print, not the ppi setting of the image file.
When an image is sent to the printer, the image editor or printer driver resizes it to the printer's native resolution-- 720 dpi for Epson Photo printers; 600 dpi for HP and Canon. No manual resizing is required. There is some controversy about how good a job image editors do (particularly Photoshop). Read Qimage Print Quality Challenge to learn more. I'm pleased with the results I get from Picture Window Pro.
Most digital images must be resized down for the monitor display-- for web pages or e-mail. Many people are careful to scale the resized images to 72 dpi. Absolutely unnecessary. I know of no web browser or viewing software that pays any attention to the dpi setting. Most monitors actually display 80-100 pixels per inch, anyway.
Image file formats
Several file formats are available for image storage. The most important are TIFF, JPEG, GIF, and PNG. The primary difference between them is the type and amount of image compression. Compression reduces the amount of storage space required by an image. For example, a 1600x2000 pixel 24-bit color image (3 bytes per pixel) requires 9.6 megabytes to store without compression; it requires considerably less with compression. There are two types of compression. - Lossless compression maintains all image detail, bit-by-bit. Typical compression ratios are 30-50%, depending on the detail in the image. The finer the detail, the less the compression. Lossless compression is used by the PNG format. It is available, though rarely used, with the TIFF format.
- Lossy compression sacrifices detail in order to achieve higher compression ratios. The amount of compression depends on the detail in the image and the quality level selected when the image is saved. JPEG and GIF use different types of lossy compression.
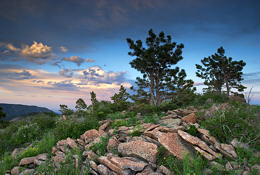
| The image on the right is used as to illustrate compression. It is a 24-bit color 260x175 pixel image (3 bytes per pixel), and therefore contains 136,500 bytes (136.5 kB). It was stored as a 100% Quality JPEG, 46.3 kB in size. The compression ratio is 136.5/46.3 = 2.95x. 100% JPEGs are virtually indistinguishable from uncompressed TIFF images-- they contain a tiny loss that would only become visible after the file was repeatedly opened and saved. The storage required for this image in each format is shown below in (bold blue). Web browsers support JPEG, GIF, and PNG formats, but not TIFF. | 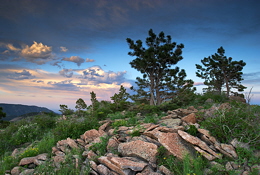 |
- TIFF files (identified by the .tif extension) are normally uncompressed. Lossless compression is available, but not universally supported. TIFF is highly versatile; it can store 16/48-bit images and metadata, such as Description, Artist's name, and Copyright, in tagged fields. This makes TIFF files slightly larger than the images they contain. TIFF is the format of choice for saving images intended for high quality printed output. (138.5 kB)
- PNG (.png) is another format worth considering. It uses lossless compression: image quality is equal to TIFF but file size can be considerably smaller, though generally larger than JPEG. PNG is supported by most web browsers and image editors, but it isn't widely used-- it's undoubtedly the most underrated image file format. I occasionally use it for Web display of Black & White images, such as the gamma test pattern, because it compresses almost as well as JPEG, which doesn't support B&W. PNG was created to circumvent the LZW patent used in GIF and TIFF formats. (96.3 kB; 1.42x)
- GIF (.gif) is best for Web display of block graphics and charts. Its limited color palette makes it a poor choice for high-quality photographic images, although it's often used for thumbnails. GIF files can be very compact; they lack the wavy edge artifacts of JPEG files (38.2 kB; 3.6x)
- JPEG (.jpg) is the most popular format for Web display of photographic images. Its principal feature is lossy compression, which can result in artifacts, most notably a wavy appearance near boundaries. The loss in quality and the stored image size depends on the Quality setting used to save the image. Higher quality JPEGs are larger but have more detail and fewer artifacts. JPEGs typically range from 1/5 to 1/25 the size of TIFFs. This is illustrated below for an image saved by Picture Window Pro with JPEG quality levels of 90%, 70%, and 30%.
| The images below illustrate the effects of the JPEG Quality setting on image compression with Picture Window Pro. The dialog box is shown on the right. I use quality levels between about 80 and 95% for most images in this site. |  |
|  | 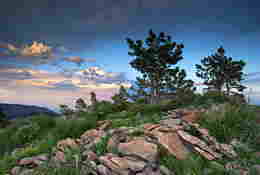 |
| 90% quality; 15.3 kB; 8.9x.Quality is close to 100%, but a little waviness-- the classic JPEG artifact-- is visible in the sky near the trees. | 70% quality; 8.9 kB; 15.3x. Image quality is still pretty good, but wavy artifacts are significantly worse and detail in the rocks is reduced. | 30% quality; 6.1 kB; 22.4x. Image quality is quite poor. Wavy artifacts are obvious; there is significant loss of detail, and square zones are visible in the sky. |
Every program has its own JPEG Quality settings; there is no universal standard. Photoshop has settings between 0 and 12. IrfanView (a handy little editing utility) has settings between 0 and 100. The relationship between settings in different programs is anything but linear. PW Pro Quality = 70% (8.9 kB) is roughly equivalent to Irfanview Quality = 50% (7.9 kB) and Photoshop Quality = 3 (33 kB in Photoshop CS; 13.8 kB in Photoshop 6). Photoshop files are considerably larger, even though have no embedded ICC profiles, perhaps because they have extra space reserved for Exif data (digital camera settings). This can be a disadvantage for small images used for Web display.
Many digital cameras store images in JPEG format. This can lead to problems because image quality can deteriorate when images are saved and reloaded in JPEG format. The deterioration is tiny when files are saved at the highest possible JPEG quality, but it can become serious if less than maximum JPEG quality is selected. JPEGs should be used with caution for images intended for high quality quality printed output. If you plan to do much editing on a JPEG image, it's best to convert it to TIFF. No quality is lost when images are stored and reloaded in TIFF format.
Additional file formats You may occasionally encounter these, but they're not recommended for general use.
Macintosh users should add the appropriate three leter suffix (JPG, TIF, PNG, etc.) to file names to make it easier for us Windows users to read.
- JPEG 2000 An update of JPEG that offers a higher degree of compression at the same image quality level as well as an option for lossless compression. It also has options for fast display when full resolution isn't needed. It should be an excellent format once it's widely adapted, but few web browsers support it as of early 2004. I will avoid it until all major web browsers (Internet Explorer, Mozilla, and the Mac browsers) have supported it for at least a year.
- PSD Adobe Photoshop Document. Designed by Adobe for use within Photoshop; not supported by web browsers and most image editors. It sould not be used for file interchange. To be used with programs other than Photoshop, PSD files generally have to be transformed into a standard format such as TIFF. Irfanview is a great little program for translating them.
- BMP Windows bitmap format. A widely-supported uncompressed format that lacks the versatility of TIFF. TIFF should be used in its place whenever possible.
.

| Images and text copyright © 2000-2009 by Norman Koren. Norman Koren lives in Boulder, Colorado, founded Imatest LLC in 2004, previously worked on magnetic recording technology. He has been involved with photography since 1964. |  |
0 comments:
Post a Comment